Process Optimization
Nozzle Angle is Co-MVP
Popular categories
Featured posts
Approach the target at just the right angle and get the job done consistently and efficiently. Just ask Javy Baez of the Chicago Cubs. He morphed his body to form an acute angle to home plate as he squeaked under the legs of Dodger’s Catcher, Ruiz, in Game 1 of the NLCS.

Key Points:
Nozzle angle is the quiet, oft-forgotten cousin of nozzle distance. Every micron matters in MicroBlasting, so the angle of the nozzle is essential to successful selective removal.
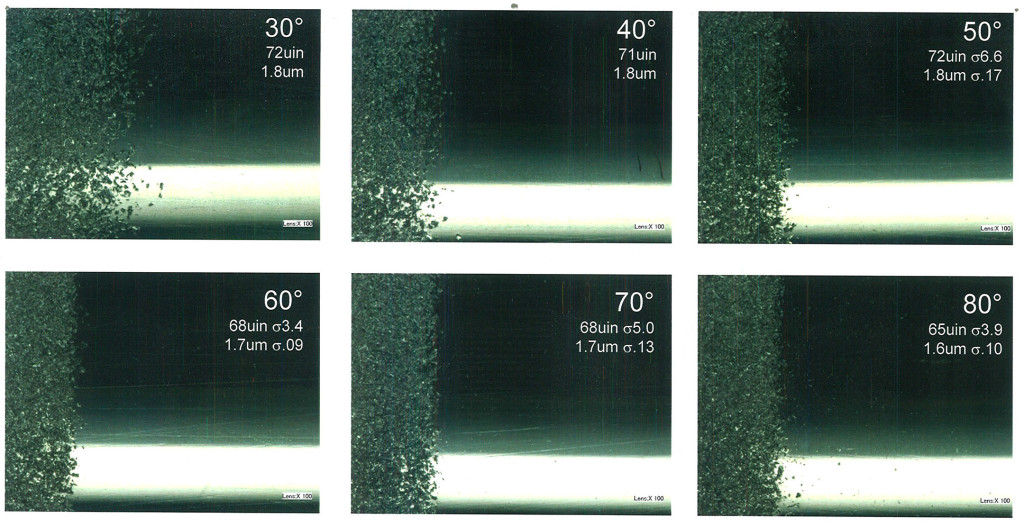
- Peak roughness tends to happen at 90°*
- Peak removal rate tends to happen at 75°*
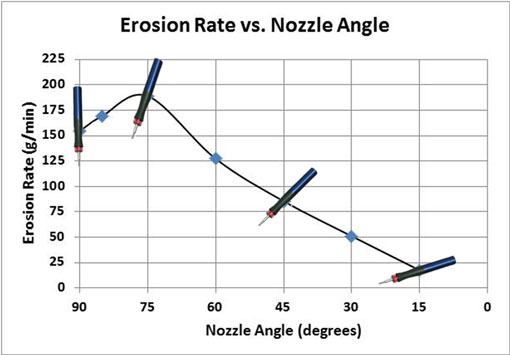
Peak Removal
- As nozzle angle to target decreases, blast area increases, increasing erosion.
- As nozzle angle to target increases, impact energy increases, increasing erosion.
- As nozzle angle to target increases from 75° to 90°, ricochet and backscatter block incoming particles, decreasing erosion.
Abrasive particles transfer the most impact energy when the nozzle is positioned at 90° to the target, but abrasive particles ricochet at this direct angle, crowding and slowing the stream. When cleaning or eroding surface material, hold the nozzle at or near a 75° angle to the target. Abrasive particles will strike the target with a strong impact but have enough clearance to make room for incoming abrasive.
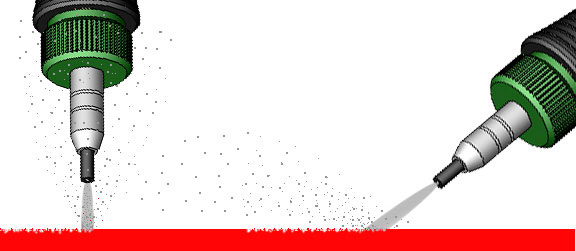
Some cleaning applications run more smoothly when the nozzle is held at a shallower angle, more level to the part’s surface. A shallow blast angle can better peel a coating that sticks to itself. Conformal coatings like PTFE, Teflon, and coatings on medical parts and circuit boards benefit from a 15-30° angle of attack.
Peak Roughness
Texturing? Know this about roughness:
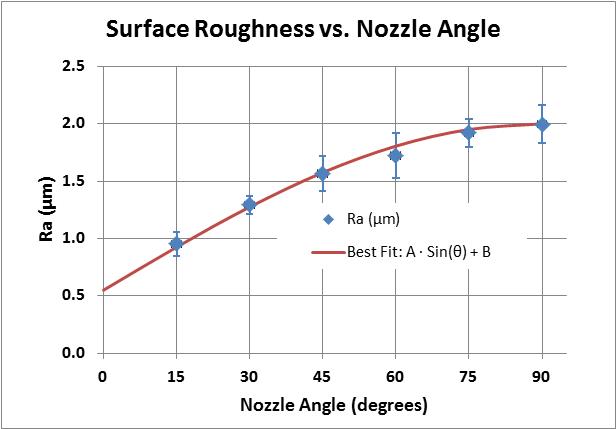
- The surface roughness (Ra value) is highly dependent on the angle of the nozzle with respect to the part.
- Roughness is greatest when the nozzle is pointed directly at the part (90º angle to target).
- Roughness decreases proportionally to the Sine of the angle between the nozzle and the part.
Abrasive ricochet does not present the same issues during texturing. The energy lost by the ricochet is less than the energy lost by tilting the nozzle at an angle. Plus, the spray pattern is more uniform at 90°, so start with your nozzle perpendicular to the target as you dial in your process.
There are Exceptions!
- Covering multiple surfaces at once?
- If you need to cover multiple surface faces on a part, holding the nozzle at a 45° angle should allow abrasive to cover two or more sides at once, omitting the need for heavy nozzle manipulation. Increase your blast pressure as your angle decreases to maintain surface roughness.
- Need a sharper delineation?
- A slight step below a 90° angle to the target should improve the delineation on one side of the blast pattern. For instance, hold the nozzle at a 65-70°angle on dental implants that require a very sharp delineation on the collar end. No masking is necessary at this angle.
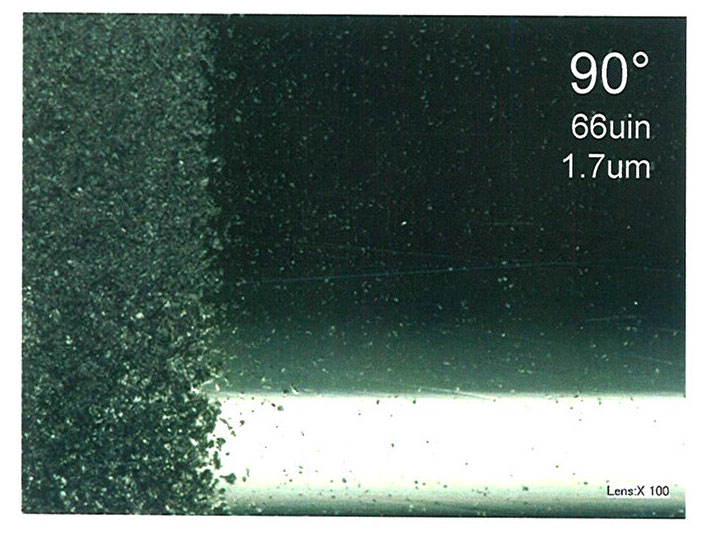
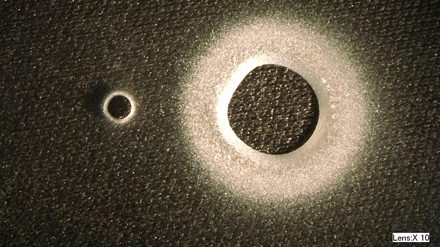
The images above and below are taken from a sample test performed using a Comco AccuFlo® micro-abrasive blaster, blasting 150 µm aluminum oxide through a 0.046″ Hi/Performance nozzle at a distance of 0.030″ from the part surface, 4x speed in, 2 turn pauses at delineation, 1x speed out (N=5).
The sample benefitted from a 60-70° nozzle angle (bottom left and middle). These samples have excellent sharp delineations and no overspray.
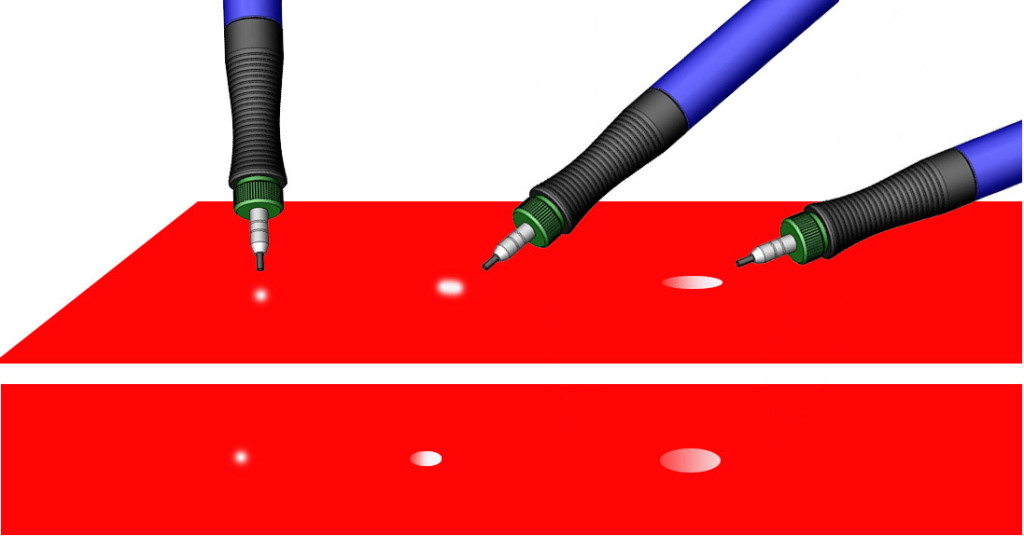
Like Shining a Flashlight on the Ground
Your nozzle angle determines your spot size, depth, and shape. The best way to demonstrate this idea is with a flashlight. Hold a flashlight perpendicular to a level plot of ground and chances are you are going to see a perfect circle of light with almost uniform saturation throughout. As you tilt the flashlight to an angle, the light cast becomes an oval shape that is brighter at the end closest to the flashlight bulb.
The same is basically true in MicroBlasting. Notice below how the end of the spot closest to the round nozzle has a thicker saturation of white, indicating that part of the surface receives more of the abrasive stream.
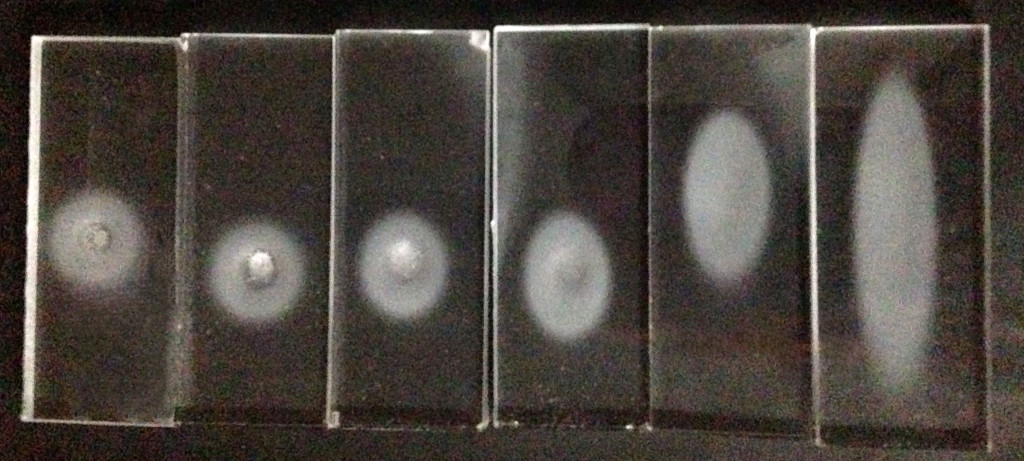
The informal test slides below show the changes in blasting pattern that happen as the nozzle angle shifts 15°. On slide #1 at the far left where the nozzle blasted from a 90° angle, the spot shape is circular and more symmetrical, with the deepest part of the bore at the center of the blasted area.
The spot shape on slide #2, where the nozzle was held at a 75° angle, is not as symmetrical as slide #1, but the bore is deeper. This illustrates that spot size grows longer and shallower as the nozzle gets closer to a horizontal position, decreasing its angle to the slide.
Automation that is Flexible
Manual applications benefit from the dexterity of the operator’s wrist, but Comco’s automated systems are not as static as you might think. The JetCenter features two additions to our standard automated platform: an additional axis of motion and the optional twist wrist.
Extra travel and flexibility allow nozzles to better follow the contour of larger parts, more complex parts, and multiple parts simultaneously. The JetCenter is the closest we have come to duplicating the flexibility of the human wrist in automation. See the Twist Wrist and Flipper Gripper on the JetCenter in the video below.
“Do Simple Better”
MicroBlasting may not be as exciting as baseball, but the trademark wisdom of Cubs’ Manager, Joe Maddon, is applicable across industries: get a handle on the basic details and establish a plan for experimentation. Fortunately, we are here to help you eliminate the guesswork. Arrange a sample test with our Applications Lab if MicroBlasting looks like a good solution for your production challenges.